Every Windows device has a hidden folder called the System Volume Information Folder. This tutorial explains the importance of this hidden Windows folder and the process of opening it.
What is a System Volume Information Folder?
It is a hidden folder automatically created by the Windows Operating system to store system-level information.
System Volume Information is a highly protected Windows Folder.
It is a highly protected folder. Even users with administrative privileges cannot open or delete it. One might wonder why Windows protects this hidden folder from regular users.
It is because, in this folder, Windows OS stores critical information like restore points, NTFS Disk Quota Settings, indexing service database, etc. Let us check the critical information stored in the System Volume Information directory.
What Information is in the System Volume Information Folder?
Windows 11 creates a System Volume Information folder with every partition (including the USB storage) to store the following critical information.
Indexing Service Database
Volume Shadow Copy
-
NTFS Disk Quota Settings
-
System Restore Points
Distributed Link Tracking Service Database
DFS Replication and File deduplication service database
Now you understand why the OS takes too much care in protecting this directory from normal Windows users.
You cannot delete the System Volume Information Folder in the NTFS partitioned disk.
I believe you are ready for the second part of this tutorial. Yes, we can open this folder (though not recommended by Windows). Let us check the different methods to open the Windows System Volume Information directory.
How Do I Open The System Volume Information Folder in Windows 11?
The default NTFS permission prevents anyone from opening the System Volume Information directory. When a user tries to open it, he will get the following error message.
Location is not available. C:\System Volume Information is not accessible. Access denied.
The solution is to change the default Windows 11 permission. Let me explain it step by step.
Type cmd on the Windows 11 Search. You can open the Windows 11 Search box by holding the Windows and S keys together.
Open the Windows 11 Command Prompt as an administrator.

Click the option Run as administrator.
Type the following DOS command and press the Enter key.
takeown /f "C:\System Volume information"
Check the screenshot for the result.

Windows says SUCCESS: The file (or folder): "C:\System Volume information" is now owned by user "DESKTOP-N79IIT1\Acer".
You must note down the name of the user. My name is "DESKTOP-N79IIT1\Acer". Now, execute the following command.
icacls "C:\System Volume Information" /grant DESKTOP-N79IIT1\Acer:F
Do not forget to change the name (DESKTOP-N79IIT1\Acer) with your name.See the result.

Now, you can go to the drive and activate the option to show hidden files and folders. Windows 11 will display the System Volume Information directory on that drive.
How Do I Protect the Access To the System Volume Information Folder?
I do not recommend you open the System Volume Information directory and delete the stored files. So, let us check how to reverse the permission set we made.
Type the following commands on the Windows 11 Command Prompt.
icacls "C:\System Volume Information" /setowner "NT Authority\System"
icacls "C:\System Volume Information" /remove DESKTOP-N79IIT1\Acer

Do not forget to change the part DESKTOP-N79IIT1\Acer with your system name.
Open System Volume Information Folder
Let us check how to access the System Volume Information directory on older Windows versions. It does not apply to the NTFS file system but to FAT32.
- Open My Computer and Click on Tools (On the Top menu)
- Click on Folder Options and click the View tab.
- Follow the steps below.
- Select Show hidden files and folders
- Uncheck the Hide protected operating system files (Recommended) check box.
- Uncheck Use simple file sharing (Recommended) check box
Click Yes when it needs confirmation. Now Click on Save and OK.

- Select Show hidden files and folders
- Grant Access to the System Volume Information folder
- Right Click on the Folder and Click on Properties.
- Click on the Security tab.
- Now we need to add the user account from which we need to access the folder.
- Click the OK button to finish this process.
- Right Click on the Folder and Click on Properties.
What To Do If System Volume Information Folder Takes Too Much Storage Space?
A common problem in Windows laptops is that the System Volume Information folder consumes too much storage space on the SSD.
I have read in the Dell support forum that one user complained about the System volume Information taking half of the SSD. He requested support for cleaning up the junk files stored in the system Volume Information directory on his Dell laptop.
An improper partition configuration can lead the System Volume Information to eat the lion's share of the storage drive space.
That leads to another question: can we clean up a large bulky System Volume Information drive in Windows 11?
How to Clean a Bulky System Volume Information Folder?
We can use a built-in Microsoft App Disk Cleanup to clear the content inside the System Volume Information folder. Let us check how to delete the stored files with this App.
Type Disk cleanup on the Windows Search box.
Click Run as administrator to open it.

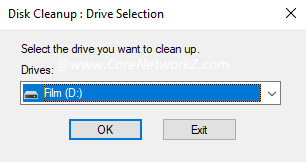
Select the drive from the drop-down menu. Then click the OK button.

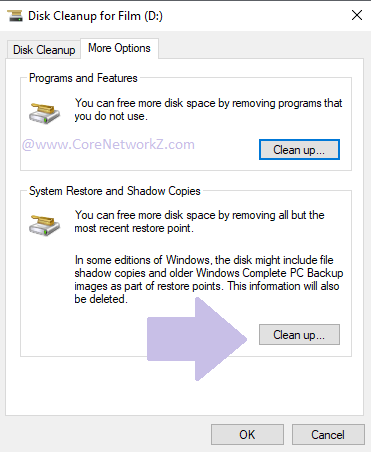
You will see the Disk Cleanup wizard. Click the More Options tab.

Click the Clean Up button below the System Restore and Shadow Copies.
Repeat the same process for other drives to empty the System Volume Information drive.
It is the correct method to clear the bulky cache stored in the Windows 11 System Volume Information folder. We can use the same method to clean the USB storage drive.
How to Delete the System Volume Information Folder On a USB Pen Drive?
You can use the method I have explained to clear the System Volume Information folder on a USB Pen Drive.
If you want to remove the entire folder, connect the USB pen drive to an Android device. Access the storage and delete the System Volume Information folder.


No comments:
Post a Comment