Welcome to the Computer Science & Technology study section by CoreNetworkZ EdTech Solutions, a leading mock test and competitive exam preparation platform, for students appearing PSC and SSC exams. This guide is specifically designed for candidates preparing for the Kerala PSC Degree Level Exam, SSC Scientific Assistant, and other IT support jobs exams.
What is Network Flow Control?
Many students (who are new to Network Engineering) asked me this question. They are not alone. A few of our readers also asked the same question. So, let me explain what network flow control is in this section.
Network Flow Control Prevents data loss in a communication.
Network flow control is a technique that regulates the number of frames transmitted between two network interfaces to avoid data conjunction. This technique is helpful when one Network Interface is faster than the other. Since you have learned the concept, let us go to the next section.
Importance of Enabling Flow Control Feature On a Network Interface Card
I write this section based on my personal experience as a Network Engineer. You can also consider it a supporting article for my other network troubleshooting guides published by CoreNetworkZ EdTech Solutions.
We need to turn on or off the flow control property of the adapter to troubleshoot some network connectivity issues.
Consider a scenario where your computer is a part of a high-speed network. What will happen if your Network Adapter receives input frames more than it can handle ( without a flow control enabled option)?
The answer is simple. It will result in frame loss.
Network Flow Control Feature Prevents Frame Loss.
Do you know why? The sender is not getting information about the possible frame loss. So, it will not stop sending more frames.
With the flow control enabled option, your Network Adapter will send a pause frame that tells the sender (sender of frames to your NIC) to pause the transmission until its buffer is free.
So, if your NIC is slower (while connecting to a high-speed network), you may need to enable the Flow Control property to avoid packet loss. I believe you have understood the importance of this feature.
How does This Study Material help PSC, SSC, and DSSSB Aspirants?
Understanding Flow Control in Computer Networks is essential for candidates appearing for the Kerala PSC Degree Level Exam, SSC Scientific Assistant (CS), and ISRO System Analyst posts. These networking fundamentals are core parts of the Computer Science syllabus.
Kerala PSC Degree Level examinations have a Computer Science section where students can expect questions that require them to explain the Flow Control in Computer Networks. You can check the Kerala PSC Degree Level Common Prelims Syllabus under the Computer Science section. I recommend you download the syllabus using this official link.
Reference: https://www.keralapsc.gov.in/sites/default/files/2021-02/syllubus.pdf
How To Enable or Disable Flow Control?
In this section, I will explain how to activate the Adapter flow control on a Windows computer.
Go to Network Connections Window
We can access the Network Connections Window via two methods. The first method is via the Run command. The second method is the Windows GUI. I will explain both methods in this section.
- By Run Command
- Click on Start
- Type ncpa.cpl on Search and press the Enter key.
- By GUI
- Click on Start
- Go to Control Panel
- Click on Network and sharing center
- Click on Change Adapter Settings
Now, you are in the Network Adapter window, where you can see all the NICs installed on your computer.

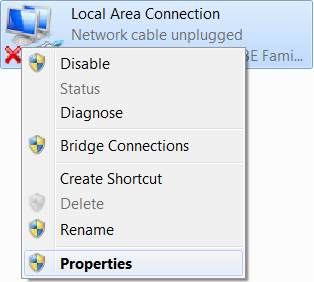
Right-click on the Local Area Connection, and click on the Properties option. You can see the screenshot of the right-click menu below.
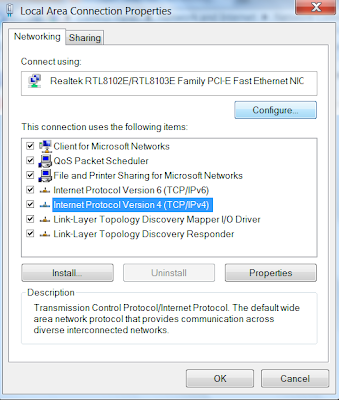
Click the Configure button
Now, you may receive one warning message, "You have made changes to the properties of this connection. If you proceed, your changes will be lost. Do you wish to proceed?".
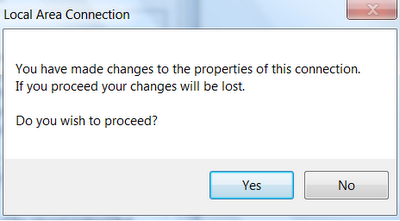
Click on the yes button to proceed.
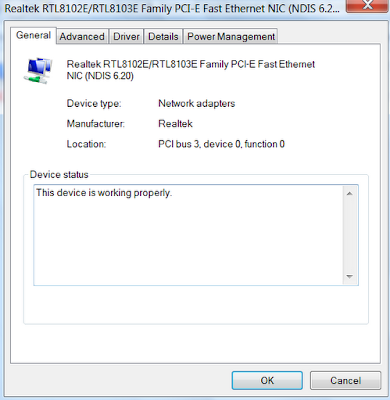
Click the Advanced Tab
-
Select Flow Control from the list and choose Enable.
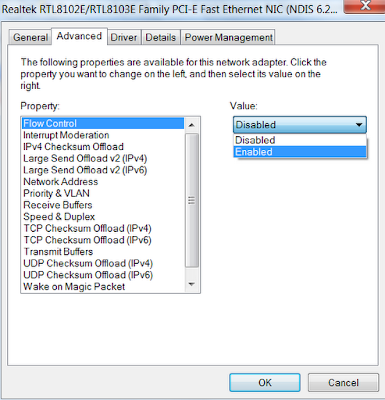
After selecting the option, you should click OK. Now, the flow control property of the Ethernet adapter is enabled.
If you want to change the link speed and duplex settings, select Speed and Duplex.
With these five steps, you can turn on or deactivate the Network Adapter flow control on a Windows device.
Steps to Enable NIC Flow Control On an Ubuntu Linux Laptop
I saw comments from Stephen Curry and Chris Paul asking me to explain how to enable Network Interface flow control on a Linux device. I will answer their questions in this section.
You can perform it on an Ubuntu PC by following the steps below.
Open Terminal and type the following commands.
sudo apt-get update
sudo apt-get install ethtool
Type the following command to enable NIC flow control.
sudo ethtool -A eth0 rx on tx on
Type the following command to disable NIC flow control on an Ubuntu PC.
sudo ethtool -A eth0 rx off tx off
Uses of Network Adapter Flow Control?
Richard Durrant asked me about the uses of this feature. He is a CCNA student and a regular reader of tutorials prepared by CoreNetworkZ EdTech Solutions. So, let me answer his question in this section.
The primary use is to avoid frame conjunction at the slower NIC. It will prevent data loss and improve the communication between sender and receiver Network Interfaces.
Reference
- https://www.juniper.net/documentation/us/en/software/junos/interfaces-ethernet/topics/topic-map/flow-control-ethernet-interfaces.html
- https://community.cisco.com/t5/switching/flow-control/td-p/2463281


It is a helpful article, Alex. You have explained very well how to manage ethernet flow control on a Windows 11 laptop. I have a Linux system. Can I manage flow control in it?
ReplyDeleteHello Stephen,
DeleteWelcome to CoreNetworkZ Tech Solutions. Yes, you can manage the flow control on a Linux laptop. You can do it from the ethtool utility. Thank you for reminding me that I missed the Linux platforms. I will update the article soon.
Hello Alex,
ReplyDeleteHow do I enable network flow control on my Ubuntu laptop? It is a Dell laptop.
Hello Chris,
DeleteI have updated the article with the steps to activate and deactivate network flow control on an Ubuntu laptop.
Hello Alex George,
ReplyDeleteWhat are the uses of flow control on an NIC?
Hello Richard,
DeleteWelcome to CoreNetworkZ Tech Solutions. I have updated the article with an answer to your question.
great
ReplyDeleteGreat you are doing great
ReplyDelete