Packet Needs To Be Fragmented But DF Set -Reason and Solution

Updated by: Alex George on November 23, 2013
While testing the correct MTU size of your current network, sometimes you may receive the error message "Packet needs to be fragmented but DF set". In this tutorial let us check the reason and solution for this error message. If the MTU size you have set on the ping test is too high, you will get this message. Let us check this by an example. Here I am testing whether the MTU value 1480 is the proper value for my network. The ping command to perform this test is:

ping www.corenetworkz.com -f -l 1480

  1. Here www.corenetworkz.com is the ping test destination

  2. -l is used to switch the default ping packet size. You can learn more about it by following the link below.
    Use -l to Change Default Ping Packet Size

  3. -f ensures the packets send are not fragmented.


See the test result below.
Packet needs to be fragmented but DF set


Microsoft Windows [Version 6.1.7600]
Copyright (c) 2009 Microsoft Corporation.  All rights reserved.

C:\Users\sijugk>ping www.corenetworkz.com -f -l 1480

Pinging ghs.l.google.com [74.125.200.121] with 1480 bytes of data:
Packet needs to be fragmented but DF set.

Ping statistics for 74.125.200.121:
    Packets: Sent = 4, Received = 0, Lost = 4 (100% loss),

C:\Users\sijugk>


Reasons for the Message Packet needs to be fragmented but DF set
If the packet size you have entered is too high for your network, you will get the message Packet needs to be fragmented but DF set.

Solve the Error Packet needs to be fragmented but DF set
In order to solve the error, Packet needs to be fragmented but DF set, visit the link below and follow the steps mentioned on the tutorial.
Testing Proper MTU Size Of Your Network

Technology Portal

Author: Alex George

Author

Alex George is the Chief Editor and founder of CoreNetworkZ Tech Solutions. He is a senior software developer with 20 years of experience.

You can contact him at alex.george@corenetworkz.com.

We all know the default size of ping ICMP echo request packet. That is 32 byte. Though the default ping packet size is 32 bytes, we can change it by a simple command while pinging a destination from your computer. By using -l option, you can decide the size of the echo request packets. The valid value of the size of ICMP packets is from 0 to 65500. So the size of the packet should fall in the range.

If you set any value, not in the range of 0-65500, you will get an error with warning bad value for -l, the value range is from 0 to 65500.

If you are facing issues with an MTU value of ICMP packets sent from your computer, changing their size may help you.

Let us check how to change the default packet size of ping echo request.

You need to use the command format provided below.

ping -l (value between 0 to 65500) [Destination Address]


Practical Example
Here let us check how to use this command to change the default size of ICMP echo request packets.

I am going to send packets to a destination address with manually configured value.

Here I use different values, and you can see the result on the screenshot provided below.

Example- ping -l 50 www.corenetworkz.com

Here I have changed the default value of 32 with 50.

Let us check how this command changes the size of echo packets send from your computer.
Change value

The above picture shows ping packets send with different sizes.

So I believe you have learned the procedure to assign any size for the ICMP request packets sent from your computer.

  1. Destination Net Unreachable
  2. Request Timed Out
  3. How to Solve APIPA?

Likewise, if you want to change the default number of Echo requests send from your computer, you can do it by following the instructions provided in the link below.
How to Perform Continuous Ping Operation to a Destination Until Manually Stop

Not just the default size of the Ping requests but the TTL value too can be changed from your computer.

  1. How to Set Chrome Auto Resume Failed File Download Feature?
  2. How to Setup Idea 4G On Android Phone?
  3. How to Bypass Vista Admin Password?

If you want to change the default TTL value of the ICMP requests send from your computer like you have changed the default size, click on the link below.
How to Change Default TTL Value Set

  1. PING: Transmit failed. General Failure
  2. Ping Request Could not Find Host. Please Check the Name and Try again
  3. Error 628: The Connection was Terminated by the Remote computer

Sometimes ping packets send from your computer with different packet sizes may bring you certain error messages instead of a proper reply from the destination.

  1. Error 797: A Connection to the Remote Access Server was not Made
  2. Adobe Flash Player has Stopped a Potentially Unsafe Operation
  3. Setup Siemens SpeedStream Modem With Bell PPP DSL Internet

Most of the time it might be related to some other issues.

  1. Enable Boot/ Shutdown/ Logon and Logoff Status Messages
  2. The Best Free LAN Messengers & Download Links
  3. Google Chrome Browser To Access A Remote Computer

The link provided below shows such an error.
Echo Reply Shows Hardware Error Instead Proper Reply

Author: Alex George

Author

Alex George is the Chief Editor and founder of CoreNetworkZ Tech Solutions. He is a senior software developer with 20 years of experience.

You can contact him at alex.george@corenetworkz.com.

D-Link DSL-2520U ADSL2+ Ethernet/USB Combo Router is a high-speed ADSL Modem with routing feature. DSL-2520U can support up to 2 Mbps upstream and 24 Mbps downstream. You do not need extra Firewall protection If you are using DSL-2520U ADSL2+ Ethernet/USB Combo Router as ADSL modem. It is because DSL-2520U has its own built-in firewall. Another advantage of using D-Link DSL-2520U is the NAT firewall and SPI support for your network.

Since it is a modem cum router with DHCP feature, you do not need another device to share the Internet connection among multiple computers in your network. You can connect a computer to DSL-2520U ADSL2+ Ethernet/USB Combo Router with Ethernet cable(RJ 45), and USB cable.

Are You Facing Slower Internet With D-link?

Configure D-Link DSL-2520U ADSL2+ Ethernet/USB Combo Router


In order to configure D-Link DSL-2520U in your network, follow the instructions below.
  1. Connect the Phone cable (DSL line) to the WAN/Internet port of D-Link DSL-2520U ADSL2+  as specified by the ISP

  2. Connect D-Link DSL-2520U to Your Computer using an Ethernet cable

  3. Power on the device and type 192.168.1.1 on the address bar of a browser and log in to the web-based setup page using following details.

    Username: admin
    Password: admin

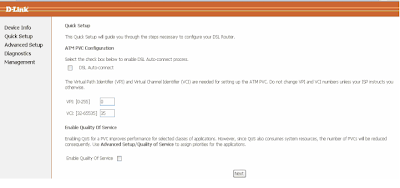
  4. Click on Quick Setup and check the box DSL Auto connect
    connection

    Click on Next

  5. Enter the VCI/VPI values provided by your ISP to configure Internet connection on your DSL Modem
    Enter VCI VPI details

    Click Next

  6. Select the connection type as specified by your ISP

  7. Configure D-Link DSL-2520U ADSL2+ Modem in PPPoE

    If your ISP provides username and password to connect to the Internet, you should configure D-Link DSL-2520U ADSL2+ in PPPoE Mode. The advantage of configuring D-Link DSL-2520U ADSL2+ modem is that you can connect multiple computers to this device and share the Internet connection among them. Steps to setup D-Link DSL-2520U ADSL2+ modem in PPPoE mode is provided below.

    1. Select the connection type PPP over Ethernet(PPPoE)

      PPPoE
      click on next.

    2. Enter the Username and password provided by your ISP
      configure PPPoE connection with your D Link modem

      click on next

    3. Check Enable NAT and Enable Firewall
       
      Enable firewall and NAT

      Click Next

    4. You must enable the DHCP server to connect multiple computers to this D-Link Modem. Modem IP address is 192.168.1.1 and Subnet Mask is 255.255.255.0
      Enable DHCP in Dlink modem

      Starting IP address is 192.168.1.2 and the end IP address is 192.168.1.254, Subnet Mask is 255.255.255.0. Now click next

    5. Now you are in the summary page.
      reboot Dlink modem

      Click on save, and D-Link modem starts to reboot.


  8. Configure D-Link DSL-2520U ADSL Modem in Bridge Mode

    If your ISP wants your modem configured in bridge mode, you can follow the steps mentioned here to setup D-Link DSL-2520U ADSL2+  in bridge mode. The issue with bridge mode is that you can connect only one computer to the D-Link DSL-2520U ADSL2+ modem and that computer will get the public IP address provided by ISP. Since there is no option to enable DHCP, you cannot use it as a router. You also need to use an external firewall if you are configuring D-Link DSL-2520U ADSL2+ modem in bridge mode because the built-in firewall is disabled in bridge mode.

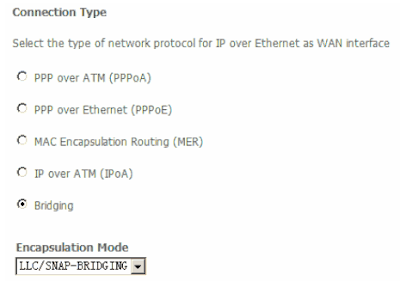
    1. Select the connection type Bridging
      Connect mode

      click Next

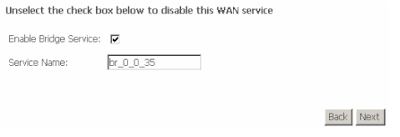
    2. Check Enable Bridge Service
      Enable Bridge service

      Click Next

    3. Enter the modem IP address as 192.168.1.1 and Subnet Mask 255.255.255.0

      Click Next

    4. Now we are at the final page of bridging D-Link ADSL Modem.

      Click Save. Now Dlink modem starts to reboot

Security Features of D-Link DSL-2520U

D-Link DSL-2520U ADSL2+ Ethernet/USB Combo Router is able to detect common attacks including DOS attack, port scan attack, etc.

  1. How To Reset Microsoft Notepad To Default Settings
  2. Turn Windows Search In to Instant Internet Search
  3. Reset BSNL Modem to Factory Default

To learn more about DOS attack and how to prevent, click on the link below.
What is DoS Attack and How to Prevent it

If you have configured D-Link DSL-2520U ADSL2+ Ethernet/USB Combo Router in bridge mode, you cannot use the router feature of this device.

  1. Precautions For ROM-0 Router Vulnerability
  2. Setup Linksys WRT54G in PPPoE Mode
  3. Make a Program Starts Automatically When Your Computer Boots

You need an additional router to connect and share the Internet among multiple computers in the network. To configure a D-Link router, visit the link below.
How to Setup D-Link Wireless Router Manually

Author: Alex George

Author

Alex George is the Chief Editor and founder of CoreNetworkZ Tech Solutions. He is a senior software developer with 20 years of experience.

You can contact him at alex.george@corenetworkz.com.

How to Power Cycle Router & Modem In a Local Home Network

Updated by: Alex George on February 01, 2013
In this article, we discuss the importance of the power cycle in solving network connectivity issues. It is the process of turning off and turning on networking devices in a systematic order. Network devices mean the Router, Modem, Switch, etc.. It sounds simple but effective to solve connectivity issues. We recommend you to perform a power cycle after you set up a new router in the local network. In this tutorial, you will learn how to power cycle devices like modem, router, switch, Access Point, etc..


How to Power cycle Modem or Router
Let us check how to power cycle a modem/router. As I explained before, power cycling is the process of the turnoff and turn on a device in systematic order. To do it, follow the instructions provided below.
  1. Disconnect Power from your Modem /Router (unplug Power Cable)
  2. Wait 30 seconds
  3. Reconnect the Power supply
  4. Wait for one minute and ensure the active LED lights on the device are not blinking (Power light, Internet light, etc.. )


How to Power Cycle Entire Computer Network
Let us check how to power cycle a small network. Consider a small home network which has two computers, one modem, and a wireless router. Steps to power cycle this network are:

  1. Unplug Power Cable from Modem
  2. Unplug Power Cable from Router
  3. Now we need to wait one minute before connecting power cable back.
  4. Power on the Router and wait till lights are steady on Router (WAN light will not light as Modem is not on).
  5. Power on Modem and Wait till all modem lights are on and steady.
One of the major benefits of performing power cycle on a local network is the synchronization of all devices in it. Once all devices on a network are synchronized properly, a lot of connection issues will disappear. In simple words, we can fix a lot of Issues like slower Internet connection, WiFi connectivity error, LAN connection problems, etc.. by a proper power cycling.

  1. Duplicate Name Exists Error While Connecting to a Network
  2. Differences Between PPPoE Mode and Bridge Mode
  3. Change Wireless Network Name on D-Link Router

Once you are power cycling a network, it is important to note that you should start with the first device. In most cases, the first device is the modem. Once you have switched off the modem, you should power off the next device connected to it.

  1. Configure Reliance DSL Broadband Modem
  2. A network cable is unplugged
  3. PING: Transmit failed. General Failure

Once you have turned off every device, you should wait for one minute. You should power on the last device turned off. Repeat the process until you have turned on every device in the network.
How to Increase The Speed of Your Internet Connection

Author: Alex George

Author

Alex George is the Chief Editor and founder of CoreNetworkZ Tech Solutions. He is a senior software developer with 20 years of experience.

You can contact him at alex.george@corenetworkz.com.

Change Wireless Network Name (SSID) On D-Link Router and Hide Network

Updated by: Alex George on January 21, 2013
One week ago one of my friends called me to fix wireless network issues at his home. He told me that his computer was receiving good network signals but once a while his device was getting disconnected without any reasons. I asked him whether his PC connected to the right network. His answer was yes. He had a D-Link router, and the wireless network name (SSID) was dlink. He was pretty sure his laptop was connected to the right network since the SSID was the same name configured on his D-Link router.

I asked him to switch off the router and check if he could connect to it. He did the same. Still, he was connected. It was another network his computer connected to with the same SSID.

To avoid this type of mistakes, you should change the default Wireless Network Name with a unique name. To change the SSID on D-Link Wireless Router, follow the steps below.

If you are looking for steps to configure Internet, follow the steps provided in the link below.
How to Setup D-Link WiFi Router

How to Change Wireless Network Name on D-Link Router

  1. Log in to D-link Router: Type 192.168.0.1 on the address bar of the browser and enter admin as the username. You can leave the password field blank.

  2. Click on the Wireless Settings tab

  3. Click on Manual Wireless Connection Setup button
    Change

  4. You can delete the default name and write a unique wireless network name
    D-link router

  5. Click on Save Settings

How to Hide D-Link Wireless Network from Others

You can have one more layer of protection by hiding your WiFi broadcast from others. Though it is not very effective against skilled intruders, there is no harm in trying this. To hide your D-Link Wireless network, follow the steps mentioned below.
  1. Log in the router and open manual wireless connection setup page.

  2. Select the visibility status as invisible

  3. Click on Save settings


Once you have completed the steps, your D-Link WiFi network will be invisible. To connect to a hidden WiFi, you have to type the SSID manually and click the connect button. So, it is important to remember the unique SSID you have set.

  1. Configure Reliance DSL Broadband Modem
  2. How to Power Cycle
  3. A Network Cable is Unplugged
  4. Ping Request Could not Find Host
  5. Setup Cox Cable Modem

This article is about how to change the D-Link router SSID. To learn more about configuring this device, click on the link below.
How to Configure WiFi on DLink

  1. How to Upgrade D-Link Router Firmware
  2. Getting Error 720 While Making a Dial-up Connection
  3. Block Websites Using D-Link Router In Home
  4. How to Reset a Modem
  5. Create Log Files for IP Messenger Installed

In case if you face any issues with connecting to the D-Link WiFi after changing the SSID, the steps mentioned in the link below can help you.
WiFi Keeps Disconnecting

Author: Alex George

Author

Alex George is the Chief Editor and founder of CoreNetworkZ Tech Solutions. He is a senior software developer with 20 years of experience.

You can contact him at alex.george@corenetworkz.com.

Newer Posts Older Posts Home