To communicate between computers in a single Local Area Network, LAN Messengers are the best option. Most of them do not need a server and have easy installation. Even some of them do not need installation, just unzip and run is enough. We can send pictures, text messages or even large files through them hassle-free. LAN Messenger data transfer is limited to a single Local Area Network and no one outside the Local network can access or participate in the communication. So it is a secure mode of data transfer and most suitable for a small office. this article introduces a list of free best LAN messengers available with download links.


  1. IP Messenger:

    IP Messenger is one of the most popular LAN messengers supports different platforms. We can chat, transfer files between computers in a Local Area Network, desktop capture etc using this tool. To learn more about steps to open the previous chat history, click on the link below.
    How to Create Log Files For IP M Installed on your Computer

    To learn more about this tool and to download, visit the link below.
    http://ipmsg.org/index.html.en

  2. Squiggle:

    Squiggle is a free LAN Messenger with a feature to bridge different Local Area Networks across a WAN. It also a serverless based on peer to peer technology. Squiggle supports chat history, spell check, group chat voice chat etc. Download link is provided below.
    http://squiggle.codeplex.com/downloads/get/507423


  3. Sourceforge LAN Messenger:

    It is a UDP based tool which supports computers in a single Local Area Network. It has a simple User Interface, IP blocking feature etc. To download and learn more about it, go to the link below.
    http://sourceforge.net/projects/lanmessenger/

  4. Hitmaneidos LAN Messenger:

    It does most of the duties of IM clients like file sharing, chat with people in the same Local Network, facility of private chat room and public chat room, facility to save conversations etc. To read about this program and download, visit the link below.
    http://www.softpedia.com/get/Internet/Chat/LAN-Messaging-Clients/hitmaneidos-LAN-Messenger.shtml

  5. Portable Peer to Peer LAN Chat:

    It is a server-less peer to peer and to learn more about it, click on the link below.
    http://portableapps.com/apps/internet/lan-messenger-portable

We have covered some of the important products but the list is not complete. There are many of them which do not need an Internet connection and server to start communication between computers connected to a single DHCP. In LAN Messenger communication it is not very important to find the location of your online friend but in Internet chat programs, it is important. To check the location of your chat friend in YM, visit the link below.
How to Find the Location Of YM Online Friend

In Internet Messenger, users can select to be invisible. If one user is in invisible mode, his/her contacts cannot see the user online. However, in YM we have a method to check if a particular user is online or in invisible mode. To learn more about it, visit the link below.
Check If a YM Contact is Invisible or Offline

No:Recent Tutorials
1 Hidden Script On Older Blog Posts "input id="jsProxy" onclick=jsCall("
2Manually Sorting Emails In Gmail To Appropriate Tabs By Moving
3 Getting GOM Default Player Check Message When I Open Video Files
Solve Drive Location Unavailable by Changing Drive Letter & Path
Make a Program Starts Automatically
Cut a Video File Using Free Video Cutter Avidemux
Yahoo Messenger has Requested Runtime to Terminate
Reverse Image Search to Find Source of a Picture
Change the Frequency of Automatic Java Update Check
Encrypt a Picture With Secret Text
I Cannot Open a Folder By Clicking On It
Convert PDF & Image Text to Notepad Format
I Cannot Boot My Computer in Safe Mode
Delete Google Web Search History From Your Account
Filter Important Emails From Gmail
Prevent Copying Files to USB Drive From Computer
disable Windows Messenger through Group Policy editor
Disable iPod Service On Windows Computer
Configure Outlook Express With Dataone Account Email
Solve Software Conflicts and System Crash On Windows
Detect Google Gtalk Invisible Users
Disable Gmail Chat Without Disable Gmail for a Network
change your system time and date display settings
Images Are Disabled On Mozilla Firefox Browser
If you are a busy type person who does not want to wait for your computer to show the status message of shutdown or log in and logoff, there is a Windows Group Policy tweak to disable them. Once you have disabled the shutdown, login or logoff message from the group policy, Windows will no longer show you the message which reminds users to wait while your computer shutdown or logoff. Let us see how to implement it on your PC.

This Operating system trick is valid only on Windows 2000, 2003 and XP.

You can enable system status message at any time by reversing the Group Policy tweak made on your computer, and you will again see the shutdown status message while your computer is turning off.

Remove Windows Shutdown and Logoff Status Message From Your Computer
To remove the Windows shutdown and logoff status message from your laptop, follow the steps below.
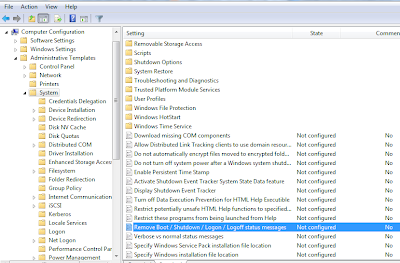
  1. Type gpedit.msc on Run or Search and press enter

  2. Click Administrative Templates

  3. Double Click System and double click on Remove Boot/ Shutdown/ Logon/ Logoff status messages(on right pane)
    How to Stop logout alert

  4. Select enable to stop Windows showing shutdown and logoff status message on your computer.
    Stop showing logout warning

Steps to Enable Boot/ Shutdown/ Logon and Logoff Status Messages
Go to the Location Administrative Templates> System> Remove Boot/ Shutdown/ Logon/ Logoff status messages and select disable to enable shutdown and logoff status message.

From Windows Group Policy Edit we can change the normal operation of most of the windows features.

In case if you want to disable access to certain tools on Windows for other users, you can set policy in Group Policy Edit.

Or if you want to stop displaying certain messages or alerts on your Windows computer as we have stopped Shutdown and logoff status alert here, you can do the same from Group Policy Edit.

  1. How to Check My Tata Photon Plus Internet Usage?
  2. Make Sure your Computer and Network are Safe
  3. Don't Get Fooled by MacDefender a Fake Anti-Malware Program

To learn more about it click on the link below.
Can not Access Control Panel and Enable Entry Using Group Policy Edit

  1. How to Solve the Destination Net Unreachable Error?
  2. How to Disable or Enable USB Ports from Registry?
  3. Getting Error Code 0x80070424 After Running Windows Live Update

Just like Group Policy Edit, another important Microsoft tool is Registry Editor. Registry Editor is also used to stop or manipulate the normal operation of Windows features.

  1. Resolve Getting 169.254.X.X (APIPA) Windows Automatic Private IP Address
  2. Ping Gives Hardware Error
  3. Add More Locations in Send To Menu

As you know, it is not recommended to play with this tool unless you know how to handle it.

  1. How to Change Default Size of Ping Echo Request?
  2. How to Set Continues Ping?
  3. Which is the Best Free LAN Messenger?

Certain malware can disable the entry of the user to these tools.

  1. How to Setup Free Godaddy Email Account?
  2. Turn Off / On Windows Security and Maintenance Popups
  3. How to Start WLAN AutoConfig (WLANSVC Service) On Windows 10?

If you face such issues, follow the solution provided in the link below.
RegEdit Is Disabled By Administrator- How to Unlock RegEdit & Enable Registry Editor
We all know the default size of ping ICMP echo request packet. That is 32 byte. Though the default ping packet size is 32 bytes, we can change it by a simple command while pinging a destination from your computer. By using -l option, you can decide the size of the echo request packets. The valid value of the size of ICMP packets is from 0 to 65500. So the size of the packet should fall in the range.

If you set any value, not in the range of 0-65500, you will get an error with warning bad value for -l, the value range is from 0 to 65500.

If you are facing issues with an MTU value of ICMP packets sent from your computer, changing their size may help you.

Let us check how to change the default packet size of ping echo request.

You need to use the command format provided below.

ping -l (value between 0 to 65500) [Destination Address]


Practical Example
Here let us check how to use this command to change the default size of ICMP echo request packets.

I am going to send packets to a destination address with manually configured value.

Here I use different values, and you can see the result on the screenshot provided below.

Example- ping -l 50 www.corenetworkz.com

Here I have changed the default value of 32 with 50.

Let us check how this command changes the size of echo packets send from your computer.
Change value

The above picture shows ping packets send with different sizes.

So I believe you have learned the procedure to assign any size for the ICMP request packets sent from your computer.

  1. Destination Net Unreachable
  2. Request Timed Out
  3. How to Solve APIPA?

Likewise, if you want to change the default number of Echo requests send from your computer, you can do it by following the instructions provided in the link below.
How to Perform Continuous Ping Operation to a Destination Until Manually Stop

Not just the default size of the Ping requests but the TTL value too can be changed from your computer.

  1. How to Set Chrome Auto Resume Failed File Download Feature?
  2. How to Setup Idea 4G On Android Phone?
  3. How to Bypass Vista Admin Password?

If you want to change the default TTL value of the ICMP requests send from your computer like you have changed the default size, click on the link below.
How to Change Default TTL Value Set

  1. PING: Transmit failed. General Failure
  2. Ping Request Could not Find Host. Please Check the Name and Try again
  3. Error 628: The Connection was Terminated by the Remote computer

Sometimes ping packets send from your computer with different packet sizes may bring you certain error messages instead of a proper reply from the destination.

  1. Error 797: A Connection to the Remote Access Server was not Made
  2. Adobe Flash Player has Stopped a Potentially Unsafe Operation
  3. Setup Siemens SpeedStream Modem With Bell PPP DSL Internet

Most of the time it might be related to some other issues.

  1. Enable Boot/ Shutdown/ Logon and Logoff Status Messages
  2. The Best Free LAN Messengers & Download Links
  3. Google Chrome Browser To Access A Remote Computer

The link provided below shows such an error.
Echo Reply Shows Hardware Error Instead Proper Reply

How to Do Continues Ping Operation?

Published by: Alex George
Don't you know how much help the continues ping feature in checking the uptime of a remote server? If you want to check the uptime of a destination device, you can check it from your computer by performing continuous ping. You can check the uptime by analyzing the ping reply. There is a syntax for continues ping from your computer to any IP address and you have to stop the operation manually in case you don't want your computer to ping the IP any longer.

To do it from your command prompt, you can use -t syntax, and you must use the combination of keys [Ctrl] and [C] to stop the process.

The complete format of the command to perform continues ping is:

ping -t [Destination Address]

Demonstration
Here we send an unlimited number of ICMP Echo requests to a host using the command provided above.

You can see the result from the picture given below.

Example: Ping -t google.com

The above command will send continues ICMP Echo requests to Google until you stop the operation manually by pressing [Ctrl] and [C] buttons.

The below screenshot will show you more ideas about the result of continues ping operation.

I send ping packets continuously to our blog, and the screenshot shows the result.


You can use both the domain name and the IP address to perform the continues ping operation.

Just like changing the default number of ICMP echo requests, you can also change the default TTL value of ICMP Echo requests send from your computer.

To learn more about it, click on the link below.
How to Change Default Time To Live Value(TTL) Set On Echo Packets

Sometimes destination device's firewall is configured in a way to find out continues ICMP Echo requests from a source and terminate it.

In that case, we will get an invalid reply from the destination device.

  1. Error 628: The Connection was Terminated by the Remote computer
  2. Error 797: A Connection to the Remote Access Server was not Made
  3. How to Setup Siemens SpeedStream Modem With Bell PPP DSL?
  4. Adobe Flash Player has Stopped a Potentially Unsafe Operation

One of such error message is The Connection was Terminated by the Remote computer Before it Could be Completed.

  1. What is Idea 4G APN Settings For Android Phone?
  2. How to Bypass Vista Admin Password?
  3. PING: Transmit failed. General Failure
  4. Ping Request Could not Find Host. Please Check the Name and Try again

In some cases, while performing continues ping a destination, you may get host unreachable error message.

  1. What is Hardware Error?
  2. What is Request Timed Out Error?
  3. Create a Direct Download Link For Older Versions Of Google Chrome
  4. What is Destination Net Unreachable Error?

It means ICMP Echo requests send from your computer could not find the remote host.

  1. Disable the Shutdown & Logoff Status Messages
  2. How to Change the Default Size of Ping Echo Request?
  3. How to Use Google Chrome Browser To Access A Remote Computer?
  4. How to Solve 169.254.0.0 Error?

If you see this error message while contentiously sending packets to a destination, instructions provided in the below link will help you to fix the issue.
Reasons and Solution For the Error Message Remote Host Unreachable


There are many instances where we need to access a remote computer in our daily life. Those computers may be your friend's or office computer. We have many remote desktop accessing tools available, but I recommend one new tool comes with Google Chrome browser. It is a free Chrome extension which lets you access a remote computer using Google Chrome web browser. This app is known as Chrome Remote Desktop.

Using it, we can either let a friend access our computer remotely or access another remote computer.

One of the major advantages of using this app to access a remote computer is its support for various Operating systems.

It supports Windows, Linux, and Mac PCs. They claim virtually Google Chrome Remote Desktop can access any devices using a Web browser.


  1. Login to Google account on Chrome browser and visit the link below.

    https://chrome.google.com/webstore/detail/chrome-remote-desktop/gbchcmhmhahfdphkhkmpfmihenigjmpp?hl=en

  2. Click on Plus button
    Add remote desktop access

  3. Click on Add and follow the instructions
    Access remote computer using Google Chrome

This extension is very user-friendly, and you can learn to work by following the instructions with it.

We know Google Chrome offers many features like Accessing a friend's computer with his permission or take full page screenshot using Extensions.

Now it is the time to check some of the cool features offered by them. Even we can play various games using their web browser without downloading them.

To learn more about it, click on the link below.
How to Play Angry Bird On Your Desktop Without Downloading

Not just advance techniques like accessing a remote computer using a Web Browser, we can have many simple tasks using it.

One of them is the simple notepad tasks. We can use it to type and save notes just like in notepad.

To use this feature, follow the link below.
How to Use Browser to Open Online Notepad?

While accessing a remote laptop using Chrome, you may see compatibility issues if you have downloaded the older versions of the Google Chrome Web Browser on your PC.

  1. How to Change Default TTL Value Set On Ping Packets?
  2. How to Set Auto Resume Failed File Download Feature On Chrome Browser?

Since we are about to go for Remote accessing using Chrome browser, it is better to learn basic security threats.

  1. View and Delete Saved Username and Passwords From Google Chrome
  2. How to Download the Latest Google Chrome Offline Installer?

A newbie user may set the system settings to allow access to anyone without understanding the great risk associated with it.

Before using features like this, it is important to learn the basics of Internet security, and we have a list of basic security tutorials.

One of them is the TCP split handshake attack, and I suggest you read it for a start. To learn more about it click on the link below.
What is TCP Split Handshake Attack and How to Prevent It

To master the security threads related to accessing a remote computer on the Chrome browser, you must understand the steps to perform a continues Ping operation and changing the size of a Ping packet.
Newer Posts Older Posts Home